By
Unknown
•
11:58:00 PG
•
Pengetahuan
•
hye hye =D
It's has been a long time that I didn't make any entry in here.
Today I'm going to show you on how to create slideshow or GIF image using GIMP ;)
See the right GIF image at the Ads column? nice right? xD
Here's the steps.
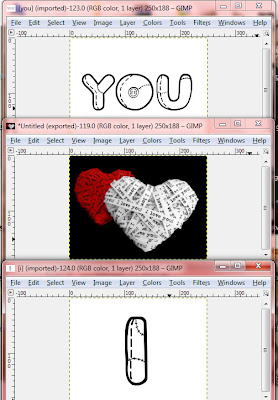 |
I will take 3 pictures to show you. You can use more than 3 pictures =D
Make sure all pictures are in the same size before you stack them onto layers.
You can resize them using the scale tools :
Tools -> Transform Tools -> Scale Or Shift+T
I resize 3 of them to 250x188 pixels (all in JPG format).
Open new blank image and set the size (follow your images size).
So mine will be 250x188 pixels.
Next bring out your Layers box :
Windows -> Dockable Dialogs -> Layers Or Ctrl+L
|
 |
Ok next go to the image that you want to appear 1st in your slideshow.
In my slide will be the "I" image.
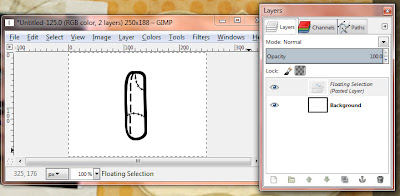
Copy the "I" image and paste it on the new blank image.
Look at the Layer box, you will see 2 layers.
The New black image as the Background and the "I" image as the Floating Selection (Pasted Layer).
|
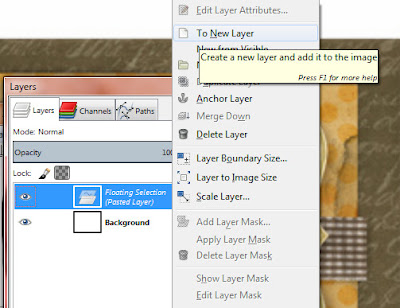 |
Click to highlight on the Floating Selection layer, then right click and a Menu will appear.
Then click To New Layer. |
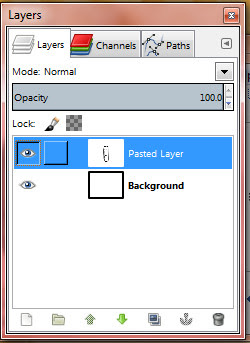 |
This is how it look after you click To New Layer =D
The "I" image is now as Pasted Layer. |
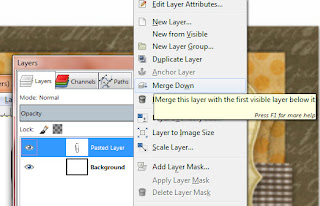 |
Now, on the same "I" image. Click it to highlight again, then right click.
Click Merge Down. |
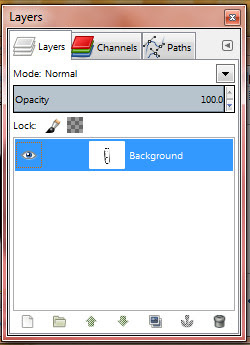 |
See that? Now the "I" image become the Background ^^ |
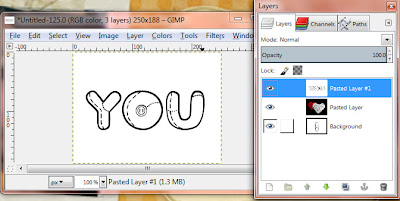 |
Repeat the same step to the other 2 images EXCEPT the Merge Down step.
You don't need to Merge Down the next images.
Remember the 1st image that appear on the slideshow will be on the bottom Layers.
Like I said earlier on, you can use more than 3 pictures =D
HoHoHoHo~ Now we are ready to make GIF Slideshow! \o/ |
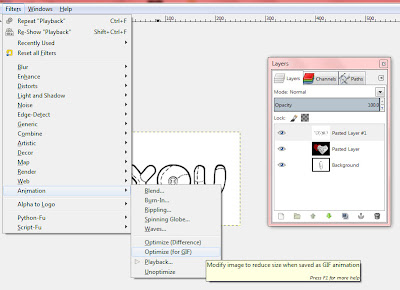 |
Now, go to Menu : Filters -> Animation -> Optimize (for GIF)
GIMP will optimize for you. Wait till a new pop out screen (with your images within it). |
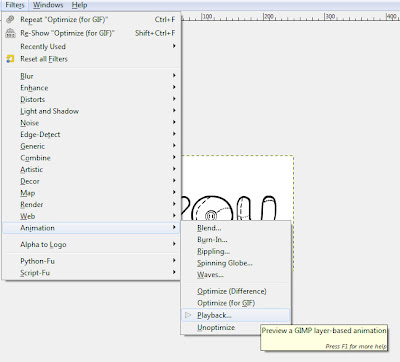 |
At the new screen, go to Menu : Filters -> Animation -> Play Back.
A player will pop out =D
Make sure all your images are in the right order. And oh please ignore the super fast speed xD
Its a default setting =D |
 |
You are almost done =D
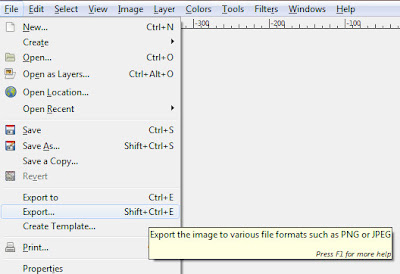
You need to Export the images to GIF format.
Go to Menu, click Export Or Shift+Ctrl+E.
Choose the GIF format or I usually will type in .gif
Then click Export. |
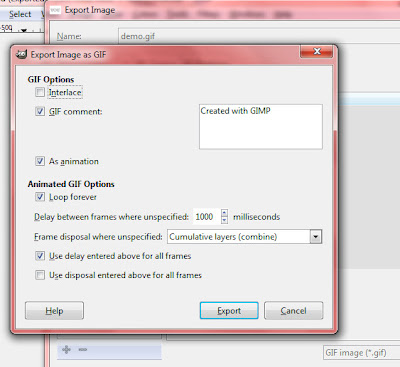 |
You will see a Menu like this.
At the Delay between frames where unspecified, type in 1000 milliseconds (1 seconds)
or any delay you want.
Make sure As animation, Loop forever and Use delay entered above for all frames are tick.
Click Export and save as .gif format. |
 |
You are done! xD
This is the result =D
If you think it's too fast or too slow, you can adjust by saving it again.
Of cos under same file name. You wouldn't want the same file all over your folder.
Now you can have your own gif slideshow ^^
Hope this super long tutorial will help you.
Please leave comments after you tried it out =D
|
SIMILAR ARTICLES


wow..nice tutorial
BalasPadamkami mmg dh lama nk blaja buat gif image
nnt nk try buat n masukkan dalam tumblr haha xD
thanks !
Thank you dan welcomes :D
BalasPadamHarap tutorial di atas dapat membantu anda.
Sebarang soalan mengenai .gif boleh dikomen dibawah posting ini.
Kami akan memcuba membantu anda.